RavenDb 4 Part 1 - Installation
This article is intended for those setting up RavenDb in a secured (non-developer) environment using x509 certificates for mutual authentication.
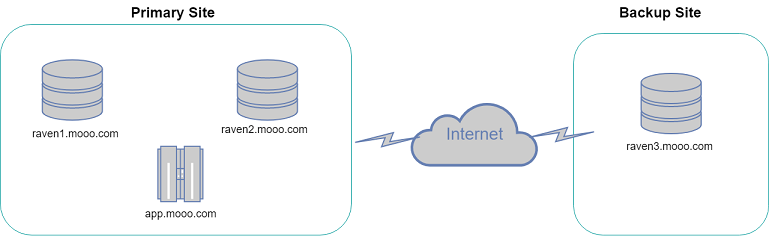
A diagram of the architecture for the purposes of this discussion is shown below.
Please note that RavenDb4 recommends a minimum of 3 nodes in a cluster however we'll use 2 and demonstrate some issues you might encounter.
Raven Server folder refers to the location where you extracted the RavenDb zip
Start administrator powershell prompt
curl.exe -LJO https://raw.githubusercontent.com/ravendb/ravendb/v4.1/scripts/certificates/powershell/generate-server-cert.ps1
Create two certificates:
.\generate-server-cert.ps1 -CN *.mooo.com -CertFile server.pfx
.\generate-server-cert.ps1 -CN *.mooo.com -CertFile client.pfx
Copy server.pfx to RavenDb Server folder (e.g. C:\RavenDB-4.2.0-windows-x64\Server)
In the RavenDb Server folder rename settings.default.json to settings.json and replace the contents with:
(replace widgets.com with the domain you used when generating the certificates)
{
  "DataDir": "RavenData",
  "License.Eula.Accepted": true,
  "Setup.Mode": "Secured",
  "Security.Certificate.Path": "server.pfx",
  "Security.Certificate.Password": "",
  "ServerUrl": "https://0.0.0.0:8080",
  "ServerUrl.Tcp": "tcp://0.0.0.0:38888",
  "PublicServerUrl": "https://raven1.widgets.com:8080",
  "PublicServerUrl.Tcp": "tcp://raven1.widgets.com:38888"
}
Ensure DNS exists for your domain. If you are running this locally then edit your hosts file and add an entry for raven1.widgets.com that points to 127.0.0.1
Using your admin powershell console navigate to base RavenDb folder (C:\RavenDB-4.2.0-windows-x64) and run run.ps1 or, if you want to run it as a service setup-as-service.ps1
//X509Certificate2 certificate = new X509Certificate2(Path.Combine(@"D:\temp\dotnetcore-webapp-spike\aspnetcoreapp\bin\Debug\netcoreapp2.2", "client.pfx"), "fred");
var store = new X509Store(StoreLocation.LocalMachine); x509.Open(OpenFlags.ReadOnly);
dotnet new webapp -o ravendemo
dotnet add package RavenDB.Client --version 4.1.5 dotnet add package Microsoft.AspNetCore.Hosting.WindowsServices
dotnet publish -c Release -r win10-x64
Last revised: 27 May, 2019 05:22 AM History
No new comments are allowed on this post.
Comments
No comments yet. Be the first!