RavenDb 4 Part 1 - Installation
This article is intended for those setting up RavenDb in a secured (non-developer) environment using x509 certificates for mutual authentication. This is a manual configuration of RavenDb that does not use LetsEncrypt certificates
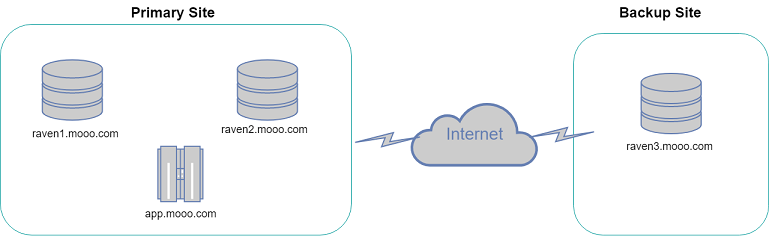
A diagram of the architecture for the purposes of this discussion is shown below.
Please note that RavenDb4 recommends a minimum of 3 nodes in a cluster however we'll use 2 and demonstrate some issues you might encounter.
Generate wildcard certificates
If you have an existing certificate (signed by CA or other) then you can skip this step.
Start an Administrator Powershell prompt - this step can be performed on any server.
Download the script used to generate the certificates - this script is from the RavenDb github repository.
curl.exe -LJO https://raw.githubusercontent.com/ravendb/ravendb/v4.1/scripts/certificates/powershell/generate-server-cert.ps1
Create two certificates:
.\generate-server-cert.ps1 -CN *.mooo.com -CertFile server.pfx
.\generate-server-cert.ps1 -CN *.mooo.com -CertFile client.pfx
RavenDb Server Installation
Follow the steps below for each instance of RavenDb e.g. servers raven1, raven2 and raven3 in this example.
Extract the RavenDb zip to a folder of your choice e.g. e.g. C:\RavenDB-4.2.0-windows-x64\
Copy server.pfx to RavenDb Server folder (e.g. C:\RavenDB-4.2.0-windows-x64\Server)
In the RavenDb Server folder rename settings.default.json to settings.json and replace the contents with:
replace raven1.mooo.com with the relevant domain - typically this will be the server name + domain name from the certificate
{
  "DataDir": "RavenData",
  "License.Eula.Accepted": true,
  "Setup.Mode": "Secured",
  "Security.Certificate.Path": "server.pfx",
  "Security.Certificate.Password": "",
  "ServerUrl": "https://0.0.0.0:8080",
  "ServerUrl.Tcp": "tcp://0.0.0.0:38888",
  "PublicServerUrl": "https://raven1.mooo.com:8080",
  "PublicServerUrl.Tcp": "tcp://raven1.mooo.com:38888"
}
Ensure DNS exists for your domains. (e.g. raven1.mooo.com) - Use the Windows hosts file if you want to try it out quickly.
Import certificate into the windows certificate store
Using your admin powershell console navigate to base RavenDb Server folder (C:\RavenDB-4.2.0-windows-x64\Server) and run
certutil -f -importpfx -user .\server.pfx
This step is necessary as it will allow the logged in user (you) to authenticate with the RavenDb instance.
Start RavenDb and checking the installation
Using your admin powershell console navigate to base RavenDb folder (C:\RavenDB-4.2.0-windows-x64) and run run.ps1 or, if you want to run it as a service setup-as-service.ps1
Navigate using Chrome to
https://raven1.mooo.com:8080
If all goes well you should be prompted to select a certificate for authentication.
Thats it! You have now set up your RavenDb instance securely. Join us in Part 2 which discusses how to get your dotnet webapp or service to talk to RavenDb.
Last revised: 27 May, 2019 05:22 AM History
No new comments are allowed on this post.
Comments
No comments yet. Be the first!