RavenDb 4 Part 2 - Client Configuration
Part 1 of this article can be found here
View the youtube walkthrough of this post which contains a few extra points of interest.
Architecture Diagram
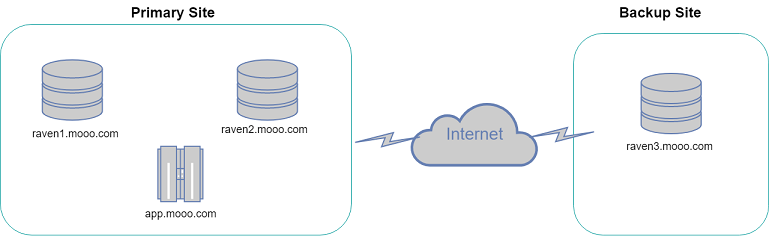
Now we have our RavenDb servers set up lets create a web app from scratch that will communicate with the RavenDb cluster.
dotnet new webapp -o ravendemo
dotnet add package RavenDB.Client --version 4.1.5
dotnet add package Microsoft.AspNetCore.Hosting.WindowsServices
Lets now add some code to configure the RavenDb DocumentStore singleton. Be sure to copy client.pfx to the output directory. For brevity the definition of the `Order class has been omitted.
var store = new DocumentStore { Urls = new[] { "https://raven1.mooo.com:8080" }, Database="TestDb"};
store.Conventions.IdentityPartsSeparator = "-";
X509Certificate2 certificate = new X509Certificate2(Path.Combine(AppDomain.CurrentDomain.BaseDirectory, "client.pfx"));
store.Certificate = certificate;
store.Initialize();
using(var session = store.OpenSession())
{
	session.Store(new Order { Name=Guid.NewGuid().ToString()});
	session.SaveChanges();
}
When you run this you receive an error
The SSL connection could not be established, see inner exception. -> The remote certificate is invalid according to the validation procedure.'
The certificate is not trusted as it is signed by an untrusted CA. Fix this by importing client.pfx which also contains the CA certificate. Note that this time we will import the certificate into Local Computer by omitting the -user flag. You will thus need to run the following in an Admin Powershell prompt:
certutil -f -importpfx z:\client.pfx
Re-run the app in Visual Studio Code and it should work this time.
This approach has a drawback in that client.pfx must be used and the password exposed potentially in a config file. An alternative is to use the Windows Certificate Store to grant access to the private key. Remove the code loading the client.pfx from a file and replace with:
var x509 = new X509Store(StoreLocation.LocalMachine);
x509.Open(OpenFlags.ReadOnly);
var certificate = x509.Certificates.Find(X509FindType.FindBySubjectName, "*.mooo.com", true)[0];
If you re-run the app it will most likely work. This is due to the fact that by default the Administrators will have access to the private keys of the cert that was imported prior. If you are running in a more locked down environment (or clear out the users in the dialog shown below) you get this error:
System.ComponentModel.Win32Exception: The credentials supplied to the package were not recognized
You will need to add yourself to the list of users who can access the private key (bring up the Dialog below via
mmc - > Add/Remove Snap-in -> Certificates -> Local Computer
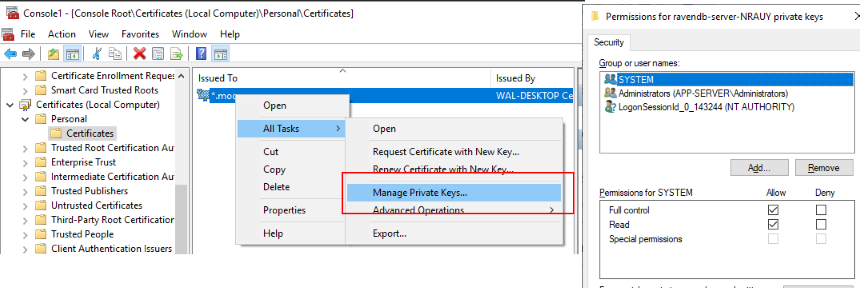
For the purposes of this article and to follow along with the video covering this article I will remove all permissions then re-add the users as required.
You'll need to add yourself (output of whoami) to this list in order to get the code working when running via Visual Studio.
Configuration when running under IIS
First publish the app via
dotnet publish -c Release -r win10-x64
We assume you have IIS installed and have modified the 'Default Web Site' physical path to point at the Release output folder (e.g. C:\temp\ravendemo\bin\Release\netcoreapp2.2\win10-x64\publish)
Turn logging on in the web.config file by setting `stdoutLogEnabled="true"
Bring up http://localhost (do not use port 5000 which is the dev environment; you want to hit IIS)
You will likely get this unhelpful error message, even whilst running on localhost.
An error occurred while starting the application. .NET Core 4.6.27617.05 X64 v4.0.0.0 | Microsoft.AspNetCore.Hosting version 2.2.0-rtm-35687 | Microsoft Windows 10.0.17763 | Need help?
Open the logs file (C:\temp\ravendemo\bin\Release\netcoreapp2.2\win10-x64\publish\logs\stdout_zzz.log ) which reveals
System.ComponentModel.Win32Exception: The credentials supplied to the package were not recognized
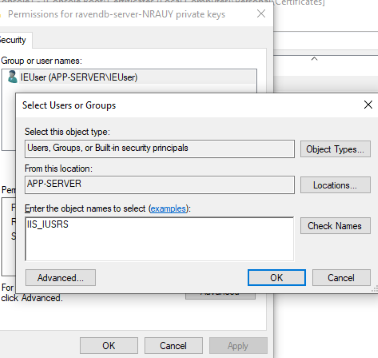
Add IIS_IUSRS to the list of users using 'Manage Private Keys' as above:
Be sure to Recycle the App Pool (DefaultAppPool) and reload http://localhost
The page should successfully load and you will see a new Order in the RavenDb Studio.
Configuration when running a Windows Service
Modify your Startup.cs so you can run the webapp as a windows service see gist
To install the service run
sc.exe create a_ravendemo binPath= "C:\temp\ravendemo\bin\Release\netcoreapp2.2\win10-x64\publish\ravendemo.exe --service"
Ensure the user whom the service is running under has access to the private key. If this is the default 'Local System Account' then you need to add the SYSTEM user instead of IIS_IUSRS as above.
Last revised: 27 May, 2019 05:39 AM History
No new comments are allowed on this post.
Comments
No comments yet. Be the first!